Archives

All posts for the month July, 2013

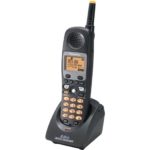
Panasonic KX-TGA450b model phone in charger standHello, this is Ben from P1Repair.com talking about….

Panasonic KX-TGA450b Cordless Phone

Buy – Sell – Repair – DIY

I have been repairing Panasonic cordless phones for over 6 years. Before that I was in the telecom repair business since 1992 repairing business class high level desk phones for companies all over the US and Canada. I got into Panasonic cordless phones when the KX-TGA400b model was discontinued by Panasonic. The phone was very popular and the keypad had significant flaws. I had been designing membrane keypad repair parts for desk phones for years so adapting it for a cordless phone was simple.

The Panasonic KX-TG4000b phone system was later replaced by the KX-TG4500b. Panasonic learned a little from their mistakes with the keypad in the 400b. The new keypad design for the KX-TGA450b did have improvements but was far from indestructible.  While the 400b had problems with all the number keys, the kx-tga450b generally only has issues with the TALK and OFF buttons. That is because more silicone rubber was used for those buttons. To speed up production they don’t cook the keypads long enough at the factory and the oils eventually seep out and clog up the button contacts. That was one of the main issues with the 400b model and is still the issue today with the 450b model.

An open view of the KX-TGA450b model phone showing the keypad and DIY repair kit

KX-TGA450b DIY Keypad Repair Kit

The membrane keypad I designed repairs all the buttons and blocks any new oils and contaminants from reaching the circuit board contacts. Membrane keypads are made of several thin layers, usually with at least a spacer layer and a conductive layer. Many membrane keypads employ additional rubber or plastic key caps to give the button a more traditional look and feel. My membrane turns the original Panasonic rubber keypad into a membrane keypad with rubber button cover. From the outside you cannot tell the difference but on the inside you have all brand new conductive contacts! The new carbon material contacts cannot wear out like the original carbon rubber buttons and they are also sealed away from any particles or oils from the rubber pad itself!

KX-TGA450b DIY Keypad Repair Kit on eBay

I have installed thousands of membrane keypads in different model phones and hundreds in the KX-TGA450b model phone. I have also sold many more self-install membrane repair kits for the KX-TG4500b cordless handsets. Custom designed and laser cut specifically for the Panasonic KX-TGA450b phone, nothing else comes close for dependability. They may not look like much but they do more than just get the job done.

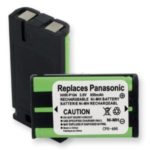
Replacement battery for KX-TGA450b phones

Using Synergy to share a mouse and keyboard between Windows 8 and Raspberry PI

I wanted to install the popular keyboard sharing software Synergy between my Windows 8 PC and a Raspberry PI running Linux. I was just starting to learn Linux and needed to get this keyboard/mouse sharing working so I could start getting used to this new (for me) OS. Unfortunately I ran into a problem making a connection between the two PCs.  Not knowing my way around Linux or the Raspberry PI made it very difficult to troubleshoot…. ironically it ended up being an issue with Windows 8 Synergy software!

ipc connection error, connection refused

2013-07-07T21:01:39 NOTE: connecting to ‘192.168.0.100’: 192.168.0.100:24800
/build/synergy-E0XzMY/synergy-1.3.8/src/lib/client/CClient.cpp,115
2013-07-07T21:01:39 WARNING: failed to connect to server: Connection refused
/build/synergy-E0XzMY/synergy-1.3.8/src/cmd/synergyc/synergyc.cpp,274
2013-07-07T21:01:39 DEBUG: retry in 1 seconds

NOTE: connecting to service… ERROR:

ipc connection error, connection refused

ipc connection error, connection refused

The problem ended up being an issue with the Synergy software itself on the Windows machine. I have Windows 8 64 bit and I logically installed Synergy for 64 bit. That ended up being a big mistake. Maybe the 64 bit version is useful on some setup, but apparently not with the RaspberryPI.


Solution:

Uninstalling the 64 bit version and downloading the 32 bit version of Synergy solved the problem.
After that it was easy as PI to set up Synergy between the two PCs! Especially since I learned a lot about both Linux and the Raspberry PI in my search for a solution. 


If you are looking for instructions to set up Synergy on Linux I suggest this page

I installed both synergy and quicksynergy:

sudo apt-get install synergy
sudo apt-get install quicksynergy

At that point you can just type quicksynergy to start the easy setup. For setting up a client just click the [Use] tab, enter the IP address of the host/server and then enter raspberrypi as the screen name. This is a great way to make sure everything is working correctly. After that you can just start synergy in client mode with ‘synergyc -f <server IP address>’ 


Next – Running Synergy automatically at desktop startup

Synergy isn’t too helpful if it’s not running and you have no keyboard on the Raspberry PI to get it running…… since I was planning on always using the built in desktop for the PI I decided to have Synergy auto start with the desktop.

Step 1.

Open a Terminal session on the Pi.  /home/pi. If you are not in the directory /home/pi , change to it by typing:

  1. $ cd /home/pi

Then cd to the .config directory by typing:

  1. $ cd .config

The ‘.’ at the start of the folder name is for hidden folders that will not show up normally.

Step 2.

Create a new directory inside .config called ‘autostart’.

  1. $ mkdir autostart

cd into that new directory by typing:

  1. $ cd autostart

Step 3.

All that remains is to edit a new configuration file. So type the following command to open the nano editor on the new file:

  1. $ nano synergy.desktop

Edit the contents of the file with the following text.

  1. [Desktop Entry]
  2. Type=Application
  3. Name=synergy
  4. Exec=synergyc -f 192.168.0.100
  5. StartupNotify=false

Replace the ip address in line 4 with the ip address of your synergy server PC

Type ctrl-X and then Y to save the changes to the file.

Thats all there is to it. The next time you reboot, synergy will restart in client mode automatically. At this point you should be able to connect your USB wifi adapter directly to the RaspberryPI and free up any ports used for the mouse and keyboard….. Yeah!


If you are looking for a keyboard sharing application for Windows only I highly recommend Input Director
I have been using Input Director for over 4 years on 2 Windows PCs at my work. It’s free and I found it very easy to set up with many useful features… and stable!