Archives

All posts by Ben

I was setting up a  Magento store that had multiple products that were actually the same product. Instead of having multiple reviews split up between the products I made a few modifications to trick Yotpo into thinking one product was really a different product.

It all revolves around the product_id so I made a new product attribute, called it yotpo_id. Simply put in the product id of the item you want to use as the review item and the modifications I made to the code will use the yotpo_id as the product_id if there is data entered for that field in the product setup.

Catalog – Attributes – Manage Attributes

+Add New Attribute

Attribute Code = yotpo_id

Assign attribute to Attribute Set as needed

Edit: default_reviews.phtml and bottomline.phtml

Found here: app/design/frontend/base/default/template/yotpo

bottomline.phtml

<?php 
$productId = $this->getProductId();
$_product = Mage::getModel('catalog/product')->load($productId);
if ($_product->getData('yotpo_id')) {
 $yotpo_id = $_product->getData('yotpo_id');
}
else
{
 $yotpo_id = $this->getProductId();
}
?>
<div class="yotpo bottomLine"
 data-product-id="<?php echo $yotpo_id ?>"
 data-url="<?php echo $this->getProductUrl() ?>">
</div>

default_reviews.phtml

<?php if (!Mage::getStoreConfig('yotpo/yotpo_general_group/disable_default_widget_position',Mage::app()->getStore())):?>
<?php 
$productId = $this->getProductId();
$_product = Mage::getModel('catalog/product')->load($productId);
if ($_product->getData('yotpo_id')) {
 $yotpo_id = $_product->getData('yotpo_id');
}
else
{
 $yotpo_id = $this->getProductId();
}
?>
<div class="yotpo yotpo-main-widget"
 data-product-id="<?php echo $yotpo_id ?>"
 data-name="<?php echo $this->getProductName() ?>"
 data-url="<?php echo $this->getProductUrl() ?>"
 data-image-url="<?php echo $this->getProductImageUrl() ?>"
 data-description="<?php echo $this->getProductDescription() ?>">
 </div>
<?php endif ?>


I hope Apple is working on this bug!

My daughter called me on FaceTime a few days ago very disturbed…. There was ant in her screen!
I didn’t know what to think of that. I had no idea what she was talking about and just decided to wait until I got home from work to see what all the commotion was about. Sure enough… it was just as she was claiming… and what I had a hard time believing…. there was an ant *INSIDE* her screen! 

Ant in between ipad LCD and touch screen

Ant under ipad glass

I’m not sure how the ant got in there… maybe through the headphone jack?

To be fair, this was an iPad I had replaced a cracked touchscreen on 6 months earlier. It was a little beat up but the edge around the screen did not have any visible openings even for the smallest bug to fit through. I’m curious if anyone with an undisturbed original screen ever runs into this bug problem.

Ant in an iPad closeup

Closeup shot of the ant stuck in the iPad screen

Please post a comment if you experience this annoying bug problem with any of your Apple products. 

Why does the #1 button fail on the KX-TGA400b phone??

The reason the keypads break is because the silicone rubber pad was not baked enough during manufacture at the factory. This leaves behind oily deposits that will seep slowly out of the keypad every time a button is pressed. This is more common than not and very difficult to identify in R&D for product development or in quality control because it takes time (not just force) to move the oil out of the rubber pad. 

The kx-tga400b / kx-tga200b models had large thick rubber buttons with plenty of oil… but that’s not the only problem. The circuit board contact pattern requires a 6mm diameter conductive pad but the keypad was made with only 4mm pads. Even when new the conductive contacts were only a hair’s width from not working at all! It was a poor design and I’m not sure how or why it passed unnoticed at Panasonic.
Why the #1 key and not so much the others? Turns out it is the way most people hold the phone and dial using their thumb. They have to reach farther with the finger to dial other buttons but the #1 is right there and maximum pressure is applied to that button. More pressure (even slightly) means more oil over time!
The other Panasonic models since then (such as the KX-TGA450b that replaced the 400b) have used thin rubber pads with a plastic key cap. This reduces the oil problem… but not ALL the buttons used this technique. In the 450b now it’s the TALK and OFF buttons that stop working eventually. But it does take longer than 6 months because the circuit board contacts were designed correctly in the 450b. 
I have been repairing Panasonic cordless phones and designing keypad repair kits for many years. I probably personally repaired over 3000 of just the 200b/400b models….. and still counting up, just slower now.
I have a web site with detailed info and help about this problem as well as offering DIY repair kits and repair service for those who do not wish to tackle it on their own. You can find me at http://p1repair.com or at Panasonic KX-TGA450b Repair

Left Floating Fan Page for Facebook

I found a popular script in many places that describe how to add a pop-out hover tab for facebook like button but they were all for the RIGHT side of the screen and I wanted this on the LEFT. With a little time and experimentation I managed to get this working the way I wanted.

facebook pop-out on the right

facebook pop-out on the right


This is the code I used:

[code]

<script type=”text/javascript”> /*<![CDATA[*/ jQuery(document).ready(function() {jQuery(“.likebox”).hover(function() {jQuery(this).stop().animate({left: “0”}, “medium”);}, function() {jQuery(this).stop().animate({left: “-250”}, “medium”);}, 500);}); /*]]>*/ </script> <style type=”text/css”> .likebox{background: url(“http://**IMAGE_URL**/facebookbadge_left.png”) no-repeat scroll right center transparent !important;display: block;float: left;height: 270px;padding: 0 24px 0 5px;width: 245px;z-index: 99999;position:fixed;left:-250px;top:10%;} .likebox div{border:none;position:relative;display:block;} .likebox span{bottom: 12px;font: 8px “lucida grande”,tahoma,verdana,arial,sans-serif;position: absolute;right: 7px;text-align: right;z-index: 99999;} .likebox span a{color: gray;text-decoration:none;} .likebox span a:hover{text-decoration:underline;} </style> <div class=”likebox” style=””> <div> <iframe src=”http://www.facebook.com/plugins/likebox.php?href=http%3A%2F%2Ffacebook.com%2F**FACEBOOK_PAGE_NAME**&width=245&colorscheme=light&show_faces=true&connections=9&stream=false&header=false&height=270″ scrolling=”no” frameborder=”0″ scrolling=”no” style=”border: medium none; overflow: hidden; height: 270px; width: 245px;background:#fff;”></iframe> </div> </div>

[/code]

You need to change the following to get this working for your Facebook page

  **FACEBOOK_PAGE_NAME**
This should be changed to your page name (note: this script does not work for personal pages)
https://www.facebook.com/**THIS IS YOUR FACEBOOK PAGE NAME**?ref=hl


http://**IMAGE_URL**/facebookbadge_left.png
**IMAGE_URL** should be changed to wherever you host your image file for the hover tab. (shown below)
Please do not link to the image here. It will not remain here long and your page will break. You need this image (or one of your own creation) on your server. If you do use a different sized image you will have to tweak the numbers in the script to have the window display in the correct location. 


facebook like pop-out tab image


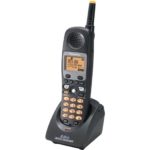
Panasonic KX-TGA450b model phone in charger standHello, this is Ben from P1Repair.com talking about….

Panasonic KX-TGA450b Cordless Phone

Buy – Sell – Repair – DIY

I have been repairing Panasonic cordless phones for over 6 years. Before that I was in the telecom repair business since 1992 repairing business class high level desk phones for companies all over the US and Canada. I got into Panasonic cordless phones when the KX-TGA400b model was discontinued by Panasonic. The phone was very popular and the keypad had significant flaws. I had been designing membrane keypad repair parts for desk phones for years so adapting it for a cordless phone was simple.

The Panasonic KX-TG4000b phone system was later replaced by the KX-TG4500b. Panasonic learned a little from their mistakes with the keypad in the 400b. The new keypad design for the KX-TGA450b did have improvements but was far from indestructible.  While the 400b had problems with all the number keys, the kx-tga450b generally only has issues with the TALK and OFF buttons. That is because more silicone rubber was used for those buttons. To speed up production they don’t cook the keypads long enough at the factory and the oils eventually seep out and clog up the button contacts. That was one of the main issues with the 400b model and is still the issue today with the 450b model.

An open view of the KX-TGA450b model phone showing the keypad and DIY repair kit

KX-TGA450b DIY Keypad Repair Kit

The membrane keypad I designed repairs all the buttons and blocks any new oils and contaminants from reaching the circuit board contacts. Membrane keypads are made of several thin layers, usually with at least a spacer layer and a conductive layer. Many membrane keypads employ additional rubber or plastic key caps to give the button a more traditional look and feel. My membrane turns the original Panasonic rubber keypad into a membrane keypad with rubber button cover. From the outside you cannot tell the difference but on the inside you have all brand new conductive contacts! The new carbon material contacts cannot wear out like the original carbon rubber buttons and they are also sealed away from any particles or oils from the rubber pad itself!

KX-TGA450b DIY Keypad Repair Kit on eBay

I have installed thousands of membrane keypads in different model phones and hundreds in the KX-TGA450b model phone. I have also sold many more self-install membrane repair kits for the KX-TG4500b cordless handsets. Custom designed and laser cut specifically for the Panasonic KX-TGA450b phone, nothing else comes close for dependability. They may not look like much but they do more than just get the job done.

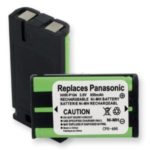
Replacement battery for KX-TGA450b phones

Using Synergy to share a mouse and keyboard between Windows 8 and Raspberry PI

I wanted to install the popular keyboard sharing software Synergy between my Windows 8 PC and a Raspberry PI running Linux. I was just starting to learn Linux and needed to get this keyboard/mouse sharing working so I could start getting used to this new (for me) OS. Unfortunately I ran into a problem making a connection between the two PCs.  Not knowing my way around Linux or the Raspberry PI made it very difficult to troubleshoot…. ironically it ended up being an issue with Windows 8 Synergy software!

ipc connection error, connection refused

2013-07-07T21:01:39 NOTE: connecting to ‘192.168.0.100’: 192.168.0.100:24800
/build/synergy-E0XzMY/synergy-1.3.8/src/lib/client/CClient.cpp,115
2013-07-07T21:01:39 WARNING: failed to connect to server: Connection refused
/build/synergy-E0XzMY/synergy-1.3.8/src/cmd/synergyc/synergyc.cpp,274
2013-07-07T21:01:39 DEBUG: retry in 1 seconds

NOTE: connecting to service… ERROR:

ipc connection error, connection refused

ipc connection error, connection refused

The problem ended up being an issue with the Synergy software itself on the Windows machine. I have Windows 8 64 bit and I logically installed Synergy for 64 bit. That ended up being a big mistake. Maybe the 64 bit version is useful on some setup, but apparently not with the RaspberryPI.


Solution:

Uninstalling the 64 bit version and downloading the 32 bit version of Synergy solved the problem.
After that it was easy as PI to set up Synergy between the two PCs! Especially since I learned a lot about both Linux and the Raspberry PI in my search for a solution. 


If you are looking for instructions to set up Synergy on Linux I suggest this page

I installed both synergy and quicksynergy:

sudo apt-get install synergy
sudo apt-get install quicksynergy

At that point you can just type quicksynergy to start the easy setup. For setting up a client just click the [Use] tab, enter the IP address of the host/server and then enter raspberrypi as the screen name. This is a great way to make sure everything is working correctly. After that you can just start synergy in client mode with ‘synergyc -f <server IP address>’ 


Next – Running Synergy automatically at desktop startup

Synergy isn’t too helpful if it’s not running and you have no keyboard on the Raspberry PI to get it running…… since I was planning on always using the built in desktop for the PI I decided to have Synergy auto start with the desktop.

Step 1.

Open a Terminal session on the Pi.  /home/pi. If you are not in the directory /home/pi , change to it by typing:

  1. $ cd /home/pi

Then cd to the .config directory by typing:

  1. $ cd .config

The ‘.’ at the start of the folder name is for hidden folders that will not show up normally.

Step 2.

Create a new directory inside .config called ‘autostart’.

  1. $ mkdir autostart

cd into that new directory by typing:

  1. $ cd autostart

Step 3.

All that remains is to edit a new configuration file. So type the following command to open the nano editor on the new file:

  1. $ nano synergy.desktop

Edit the contents of the file with the following text.

  1. [Desktop Entry]
  2. Type=Application
  3. Name=synergy
  4. Exec=synergyc -f 192.168.0.100
  5. StartupNotify=false

Replace the ip address in line 4 with the ip address of your synergy server PC

Type ctrl-X and then Y to save the changes to the file.

Thats all there is to it. The next time you reboot, synergy will restart in client mode automatically. At this point you should be able to connect your USB wifi adapter directly to the RaspberryPI and free up any ports used for the mouse and keyboard….. Yeah!


If you are looking for a keyboard sharing application for Windows only I highly recommend Input Director
I have been using Input Director for over 4 years on 2 Windows PCs at my work. It’s free and I found it very easy to set up with many useful features… and stable!


Uniden Keypad Membrane Repair

Uniden Keypad Membrane Repair

Our conductor is made of carbon material (not paint) and cannot wear out or scrape off!
Seriously, we have tested this material for over a 100K key presses and even tried to damage it with sand paper. It will not fail under normal use…. or even abnormal use!

Don’t bother trying to use conductive paint or other materials. The paint will crack and break off these flexible snap domes before you can press redial and probably lock up your keypad. Materials like tinfoil are far too conductive. They with crease or wrinkle and short out your keypad. Also if a foil gets into the wrong place it can easily cause a bad short circuit and permanent damage.

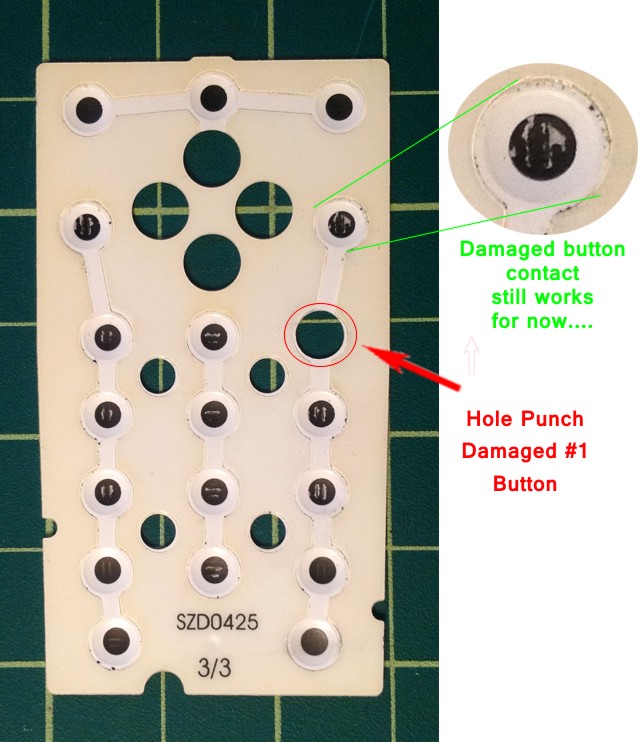
When cleaning the Uniden DECT2085 membrane be sure to stay away from the conductive black circles inside the white snap domes. They are easily damaged by cleaners, especially after being used for a long time. The snap dome contacts will still work with some damage but may experience reduced responsiveness. If a button contact is damaged you can use a hole punch to remove the damaged button and our membrane repair will become the new conductor. This will remove the snap feel of the button but most people will not notice the difference unless it is pointed out to them. Most cordless phones do not have snap feedback buttons anyway.

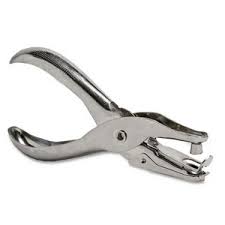
hole punch


Note: This technique will remove the snap dome for any button you puch out. These buttons will work perfectly but they will feel a little different. You should only perform the hole punch repair on buttons that do not work, then assemble the phone and try it out to see how it feels. You may then decide to hole punch out all the buttons so they all feel the same. It all depends on the individual. You may not have even noticed a difference if it had not been pointed out to you.


Click here to buy a membrane repair kit


A common failure for the small LCD displays found in electronics – missing lines.

bad lcd missing lines

Red arrows indicate missing lines in LCD
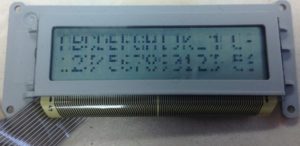
Unreadable LCD screen

Unreadable LCD screen


Are you stuck with a bad LCD that has missing lines? It is not easy finding replacement LCDs for most situations because a lot of them are custom made for a single device and just not available separately. Also the driver ICs quickly become obsolete as manufacturers find better way to do things like faster response, lower power usage or more features, etc.. so it may not even be possible to duplicate the LCD even after as little as 3 years.

If you have an LCD you would like to try to repair, maybe this information will help you accomplish your goal.

There are several ways of connecting the circuit board to the glass. The two most common are by a zebra connector (a rubber conductive strip held by pressure between the glass and the PCB) or by using a heat seal flexible conductor strip. The second is what I will be covering here. The heat seal is prone to problems late in life. As the connector dries up and exposed to alternating temperature it can lose conductivity in some of the contacts… and that causes the missing lines shown in the pictures here.

The heat seals have conductive adhesive holding them in position. They are assembled using a complicated heat sealing machine that is out of reach for even the most technically equipped of us. It is however possible to repair them with common equipment and supplies. 🙂

The first thing you need to know is the problem is almost always (more than 99% of the time) on the PCB side of the connector. The glass side hardly ever has a problem.


LCD DIsplay showing the heat seal connector

The heat seal on the circuit board side is always the problem

Now to repair your defective LCD, all you need to do is heat up that strip while applying pressure. Easy! Or is it??

The temperature required varies a bit and needs to be up there around 300 F or more. It’s unlikely you will have access to tools that can both apply heat and pressure at precise temperatures but the good news is I’ve found they are not too picky about too much heat (within reason)

Heating with a heat gun and then applying pressure does not seem to work. The good news is, a tool that can work is just as easy to come by…. it’s a soldering iron! Now you cannot just start jabbing the heat seal with a soldering iron set to melt solder. The temperature has to be lower or you will instantly melt the plasticky/paper conductor strip. Also the hard metal pointy tip isn’t the best.

What I have found success with is using a large soldering iron tip on a soldering iron set at a very low temperature (400 F is a good start) with a thin silicone pad between the iron and the heat seal. I cut a strip off a transparent silicone rubber keypad from a telephone dial pad.
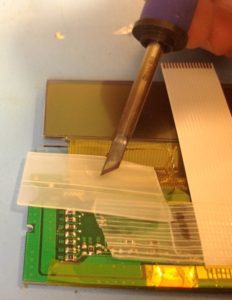
Repairing LCD with missing lines using soldering iron

Regular (large) soldering iron tip with silicone pad

It does take some practice and you need to be careful. It’s easy to slip off the pad and touch the fragile ribbon cable directly with the iron. The ribbon cable will melt almost instantly even at these low temps. Also you can rip through the silicone pad with the iron tip. If you plan on doing this more than once you may want to consider modifying a soldering iron tip to make it easier.
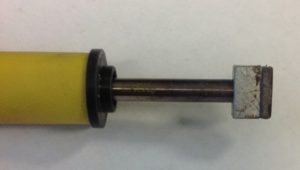
modified heat seal repair tip

Custom Heat Seal Repair soldering iron tip with rubber pad.


This is the ultimate solder-tip mod for repairing LCD displays. It’s an aluminum block with an infused high temperature rubber layer. I cut out a small rectangular piece, drilled a hole in the aluminum and just press fit a soldering iron tip that I cut the pointy tip off of. This makes it easy to apply strong downward pressure over a larger area without much risk of slipping.
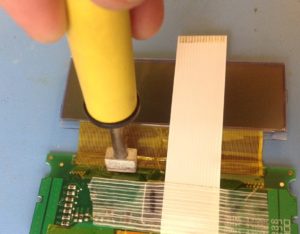
 

LCD repair using modified tip

LCD repair using modified tip


Using this tip and this technique, I have been able to repair many defective LCD displays. I even repaired one that the ribbon cable had been totally ripped off the circuit board and sat in a box for over 2 years.  I have also installed new heat seal ribbon cables on both the glass and the PCB using this tool.
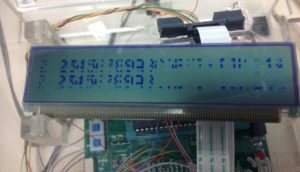
A bad LCD shown before attempting repair

A bad LCD shown before attempting repair


The LCD after heat seal repair

The LCD after heat seal repair

Anyone who has taken apart a few failing TV remotes, cordless phones or other devices with bad buttons has probably run into a curious oily liquid inside the buttons causing the problem. You can clean it up using isopropyl alcohol but the problem returns.

Like most people (including myself) when you first run into this you probably think the liquid is from a drink spill… or humidity… or maybe oil from your hand…  What is it!?!?

Come to find out…
It’s NOT from a spill, finger oil, humidity… or even spit 😉
The liquid found in rubber keypads is left over silicone oil from the manufacturing process when they rubber keypad has not been baked enough…. it’s a gooey center, undercooked rubber keypad!

Cooking those rubber pads takes a lot of time and energy….. and when you can save some time and energy (money) you can lower the cost of your product. Since it can take years for the oils to ooze out of the rubber pad it will never be caught by the development team….. and if lucky, never even cause a problem for the consumer.

I once took several different  new rubber keypads and crushed them overnight in a 3000lb press between two metal plates and a few paper towels…. just to see for myself.  The next day there was a ring of oil around each keypad in the paper,  one much more than the other. I can assure you that stain was not a drink spill, humidity or oil from my hands as I put handled the keypads.

Some rubber keypads have large rubber button contacts and those always have the most trouble with oils. A better keypad design uses a thin rubber keypad and a larger plastic button over the keypad.  Of course if one button is used more you are going to see more problems…. like the channel and volume buttons on the TV remote… or the Answer button on a cordless phone.

The KX-TGA400b phone had… no has, terrible button problems. The keypad is entirely rubber (no plastic key caps)…. and the keypad was produced as cheaply as possible (less baking). This model is famous for the #1 key not working. Being curious as to why the #1 button on a phone would be the first to act up, eventually after looking into it for a while I discovered that the way many people hold the cordless phone was the issue. Their thumb would need to apply more pressure to the top left key just by the way it was held in the hand. A little extra pressure over hundreds of button presses was all it took.

Volts – mAh – NiCD – NiMH

What’s it all mean and why should you care?!

It’s important to select the right battery for your application but sometimes that can be confusing, especially for the average person who does not deal with this all the time. Good news is, it’s not that difficult when talking about NiCD and NiMH batteries.

Volts: Each NiMH and NiCD cell has a nominal (average) charged voltage of 1.2v
The 2.4v battery packs we are discussing here are all 2-cells, no matter what the chemistry is.

mAh: Milli-amp-hours, AKA current… or better understood as ‘power’
Generally speaking, the more power the better! Your device will last longer doing the same stuff with a battery that can hold more amp-hours.
500mAh means the batter when fully charges should be able to provide 500 mA of power for 1 hour…. or 1000mA (1 amp) for 30 minutes. (I’m sure you get the idea)

As a battery ages it’s total capacity in mAh will diminish.

NiCD vs NiMH
Generally, these batteries are interchangeable… you can use  NiMH battery in place of a NiCD and vice versa. NiCD is better at handling complete discharging and often used in solar lamps. NiMH is better at handling larger power storage (more mAh!). Most modern devices use NiMH or Lithium but we still see NiCD on rare occasions. These Uniden phones are one of those. I have no idea why. There is no advantage to the NiCD battery in this situation. It must have just been a cost issue at time of development.

2.4v
This voltage choice for a cordless phone presents an issue most people are not aware of.  Many of the more advanced components used in these phones require 3.3v or even 5v just to operate. How does a 2.4v battery even work?? Well they use something called a voltage multiplier circuit to up the voltage. This requires more mAh to compensate…. draining the battery faster…. so a phone that uses a 3-cell 1200mAh battery pack will last longer than a phone that uses a 2.4v 1200mAh pack…. not because of the voltage but the fact that the 3-cell device will not need to multiply the voltage to operate 3.3v components.

The Uniden DECT1580 phone original battery was a 2.4v 700mAh pack.
The Panasonic KX-TGA400b phone originally had a 2.4v 1500mAh pack.

You can and should use the NiMH 1500mAh battery pack in the Uniden phone but you cannot use the 700mAh pack in the Panasonic phone. There are a lot of merchants advertising 700mAh batteries for the Panasonic phone, simply because the battery looks the same and has the same connector. Unfortunately this battery may appear to work, especially for the short term when new, but it will only cause problems in the Panasonic phone!! Buzzing over the talk path, poor quality audio transmit and no link to base errors are just a few of the most common problems weak batteries cause in the Panasonic phones.