Software Problems & Solutions

How to include videos in eBay listings 2017

Ebay is blocking active content in listings starting in June 2017. Still, with just weeks to go, their instructions for including videos in your eBay descriptions tell you to use flash.  After speaking with customer support, I was directed to this web page: http://pages.ebay.com/sell/itemdescription/bestpractices.html
There, in the “Including a Product Video” section the following instructions can be found:

 <video width="320" height="240">
 <source src="movie.mp4" type="video/mp4">
 <p>Here is a video of the product</p>
 </video>

This is unacceptable

1) It’s ridiculously small 320 x 240

2) In Chrome at least, all it does it place a black rectangle on the screen and you have to right click to turn on controls before you can press play.  Regular eBay users would NEVER figure that out.

3) “Here is a video of the product” will only display if the browser cannot show the video…???

You can tell eBay is really interested in helping people display video in their descriptions…..

Below is the improved code I eventually settled on

Of course you can adjust to any size you like.

<video width="640" height="480" controls="true" poster="http://YOUR-URL.com/poster.jpg">
 <source src="http://YOUR-URL.com/YOUR-VIDEO.mp4" type="video/mp4">
 Your browser does not support embedded video
</video>

In the VIDEO tag, controls=”true” is added to turn on the play, pause, volume, etc… (kind of important)!! And the poster tag links to a photo that you want to show in place of the black rectangle. I recommend making your own images the same size as the video and including text of some kind telling people to press play. Since the play button look and location can change depending on code and browser make sure you photo does not point to specific places for the controls.

Unfortunately I did not find any way to display YOUTUBE videos with this method. You need to upload the video files to your own server or find a video hosting site that allows you to link directly to the video file (mp4)
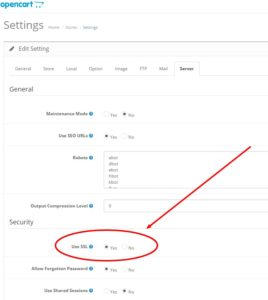
It took me some time to find out why SSL was not working. I had an installed security certificate but I was not getting the little green security lock icon and my checkout pages were not using HTTPS:// locations.

I edited config.php and admin/config.php
In both you just need to change the http://YOUR-URL to https://

// HTTPS
define('HTTPS_SERVER', 'https://YOUR-URL/admin/');
define('HTTPS_CATALOG', 'https://YOUR-URL/');

Then in settings you need to enable SSL

SSL_Settings OpenCart

STILL…. SSL was not working. After some digging I found there are 2 more files that need editing

system/config/catalog.php
system/config/admin.php

In both you need to change the following:

$_['site_ssl'] = false;

To:

$_['site_ssl'] = true;

That’s it!

I needed to add the Order ID for guest checkout in the success page for my OpenCart installation v2.2.0.0

I did not find an extension to do this and the first set of instructions I found did not work. Eventually I got it working using a combination of solutions.

First, you need to edit the success.php file in  catalog\controller\checkout\

Change this:

if (isset($this->session->data['order_id'])) {
 $this->cart->clear();

Into this:

if (isset($this->session->data['order_id'])) {
 $this->load->model('checkout/order');
 $data['orderDetails'] = $this->model_checkout_order->getOrder($this->session->data['order_id']);
 $this->cart->clear();

Next, you need to edit success.tpl in catalog\view\theme\YOUR-THEME\template\common\

Under the line <h1><?php echo $heading_title; ?></h1>  I added the following:

 <?php if(!empty($orderDetails['order_id'])): ?>
 <h2>OrderID=<?php echo $orderDetails['order_id']; ?></h2>
 <?php endif; ?>

That’s it! When a new order is placed the success page will display the Order ID under Your order has been placed! If the page is refreshed the information goes away because the variable no longer has any value and would generate an error.

I was setting up a  Magento store that had multiple products that were actually the same product. Instead of having multiple reviews split up between the products I made a few modifications to trick Yotpo into thinking one product was really a different product.

It all revolves around the product_id so I made a new product attribute, called it yotpo_id. Simply put in the product id of the item you want to use as the review item and the modifications I made to the code will use the yotpo_id as the product_id if there is data entered for that field in the product setup.

Catalog – Attributes – Manage Attributes

+Add New Attribute

Attribute Code = yotpo_id

Assign attribute to Attribute Set as needed

Edit: default_reviews.phtml and bottomline.phtml

Found here: app/design/frontend/base/default/template/yotpo

bottomline.phtml

<?php 
$productId = $this->getProductId();
$_product = Mage::getModel('catalog/product')->load($productId);
if ($_product->getData('yotpo_id')) {
 $yotpo_id = $_product->getData('yotpo_id');
}
else
{
 $yotpo_id = $this->getProductId();
}
?>
<div class="yotpo bottomLine"
 data-product-id="<?php echo $yotpo_id ?>"
 data-url="<?php echo $this->getProductUrl() ?>">
</div>

default_reviews.phtml

<?php if (!Mage::getStoreConfig('yotpo/yotpo_general_group/disable_default_widget_position',Mage::app()->getStore())):?>
<?php 
$productId = $this->getProductId();
$_product = Mage::getModel('catalog/product')->load($productId);
if ($_product->getData('yotpo_id')) {
 $yotpo_id = $_product->getData('yotpo_id');
}
else
{
 $yotpo_id = $this->getProductId();
}
?>
<div class="yotpo yotpo-main-widget"
 data-product-id="<?php echo $yotpo_id ?>"
 data-name="<?php echo $this->getProductName() ?>"
 data-url="<?php echo $this->getProductUrl() ?>"
 data-image-url="<?php echo $this->getProductImageUrl() ?>"
 data-description="<?php echo $this->getProductDescription() ?>">
 </div>
<?php endif ?>


Left Floating Fan Page for Facebook

I found a popular script in many places that describe how to add a pop-out hover tab for facebook like button but they were all for the RIGHT side of the screen and I wanted this on the LEFT. With a little time and experimentation I managed to get this working the way I wanted.

facebook pop-out on the right

facebook pop-out on the right


This is the code I used:

[code]

<script type=”text/javascript”> /*<![CDATA[*/ jQuery(document).ready(function() {jQuery(“.likebox”).hover(function() {jQuery(this).stop().animate({left: “0”}, “medium”);}, function() {jQuery(this).stop().animate({left: “-250”}, “medium”);}, 500);}); /*]]>*/ </script> <style type=”text/css”> .likebox{background: url(“http://**IMAGE_URL**/facebookbadge_left.png”) no-repeat scroll right center transparent !important;display: block;float: left;height: 270px;padding: 0 24px 0 5px;width: 245px;z-index: 99999;position:fixed;left:-250px;top:10%;} .likebox div{border:none;position:relative;display:block;} .likebox span{bottom: 12px;font: 8px “lucida grande”,tahoma,verdana,arial,sans-serif;position: absolute;right: 7px;text-align: right;z-index: 99999;} .likebox span a{color: gray;text-decoration:none;} .likebox span a:hover{text-decoration:underline;} </style> <div class=”likebox” style=””> <div> <iframe src=”http://www.facebook.com/plugins/likebox.php?href=http%3A%2F%2Ffacebook.com%2F**FACEBOOK_PAGE_NAME**&width=245&colorscheme=light&show_faces=true&connections=9&stream=false&header=false&height=270″ scrolling=”no” frameborder=”0″ scrolling=”no” style=”border: medium none; overflow: hidden; height: 270px; width: 245px;background:#fff;”></iframe> </div> </div>

[/code]

You need to change the following to get this working for your Facebook page

  **FACEBOOK_PAGE_NAME**
This should be changed to your page name (note: this script does not work for personal pages)
https://www.facebook.com/**THIS IS YOUR FACEBOOK PAGE NAME**?ref=hl


http://**IMAGE_URL**/facebookbadge_left.png
**IMAGE_URL** should be changed to wherever you host your image file for the hover tab. (shown below)
Please do not link to the image here. It will not remain here long and your page will break. You need this image (or one of your own creation) on your server. If you do use a different sized image you will have to tweak the numbers in the script to have the window display in the correct location. 


facebook like pop-out tab image


Using Synergy to share a mouse and keyboard between Windows 8 and Raspberry PI

I wanted to install the popular keyboard sharing software Synergy between my Windows 8 PC and a Raspberry PI running Linux. I was just starting to learn Linux and needed to get this keyboard/mouse sharing working so I could start getting used to this new (for me) OS. Unfortunately I ran into a problem making a connection between the two PCs.  Not knowing my way around Linux or the Raspberry PI made it very difficult to troubleshoot…. ironically it ended up being an issue with Windows 8 Synergy software!

ipc connection error, connection refused

2013-07-07T21:01:39 NOTE: connecting to ‘192.168.0.100’: 192.168.0.100:24800
/build/synergy-E0XzMY/synergy-1.3.8/src/lib/client/CClient.cpp,115
2013-07-07T21:01:39 WARNING: failed to connect to server: Connection refused
/build/synergy-E0XzMY/synergy-1.3.8/src/cmd/synergyc/synergyc.cpp,274
2013-07-07T21:01:39 DEBUG: retry in 1 seconds

NOTE: connecting to service… ERROR:

ipc connection error, connection refused

ipc connection error, connection refused

The problem ended up being an issue with the Synergy software itself on the Windows machine. I have Windows 8 64 bit and I logically installed Synergy for 64 bit. That ended up being a big mistake. Maybe the 64 bit version is useful on some setup, but apparently not with the RaspberryPI.


Solution:

Uninstalling the 64 bit version and downloading the 32 bit version of Synergy solved the problem.
After that it was easy as PI to set up Synergy between the two PCs! Especially since I learned a lot about both Linux and the Raspberry PI in my search for a solution. 


If you are looking for instructions to set up Synergy on Linux I suggest this page

I installed both synergy and quicksynergy:

sudo apt-get install synergy
sudo apt-get install quicksynergy

At that point you can just type quicksynergy to start the easy setup. For setting up a client just click the [Use] tab, enter the IP address of the host/server and then enter raspberrypi as the screen name. This is a great way to make sure everything is working correctly. After that you can just start synergy in client mode with ‘synergyc -f <server IP address>’ 


Next – Running Synergy automatically at desktop startup

Synergy isn’t too helpful if it’s not running and you have no keyboard on the Raspberry PI to get it running…… since I was planning on always using the built in desktop for the PI I decided to have Synergy auto start with the desktop.

Step 1.

Open a Terminal session on the Pi.  /home/pi. If you are not in the directory /home/pi , change to it by typing:

  1. $ cd /home/pi

Then cd to the .config directory by typing:

  1. $ cd .config

The ‘.’ at the start of the folder name is for hidden folders that will not show up normally.

Step 2.

Create a new directory inside .config called ‘autostart’.

  1. $ mkdir autostart

cd into that new directory by typing:

  1. $ cd autostart

Step 3.

All that remains is to edit a new configuration file. So type the following command to open the nano editor on the new file:

  1. $ nano synergy.desktop

Edit the contents of the file with the following text.

  1. [Desktop Entry]
  2. Type=Application
  3. Name=synergy
  4. Exec=synergyc -f 192.168.0.100
  5. StartupNotify=false

Replace the ip address in line 4 with the ip address of your synergy server PC

Type ctrl-X and then Y to save the changes to the file.

Thats all there is to it. The next time you reboot, synergy will restart in client mode automatically. At this point you should be able to connect your USB wifi adapter directly to the RaspberryPI and free up any ports used for the mouse and keyboard….. Yeah!


If you are looking for a keyboard sharing application for Windows only I highly recommend Input Director
I have been using Input Director for over 4 years on 2 Windows PCs at my work. It’s free and I found it very easy to set up with many useful features… and stable!